The third version of the app is pretty much ready to go to the store. Changes include a bugfix for attack transients, they were getting lost, plus the Principal Chorus on the Great, the Stopped Diapason Chorus on the Swell, and the two Pedal stops (Bourdon 16 and Bassoon 16) have all been very carefully revoiced, partly as a exercise to finalize the tools I need to get the ‘real’ organ app out there in the next month or son. The revoiced stops sound gorgeous, and I will revoice everything and push out a 1.4 update during the Summer. Then I can just let it sit for a while and see what people can do with it. This was always an experiment in preparation for the ‘real’ organ, hence its bargain basement price, but it has now matured into a lovely-sounding instrument, and will be a really, really nice organ after the 1.4 update to the rest of the stops.
In the meantime here’s a couple of audio examples, using only the newly-revoiced stops.
Tuesday 5 June 2018
Saturday 24 March 2018
Victorian Chapel Organ in the App Store
It's live in the App Store, for iPad and iPhone. Works on iPad 2 or newer, iPhone 4S or newer.
Monday 19 March 2018
Tuesday 6 March 2018
On the floor
Two keys at once, because I had not yet tested that. Powered USB hub into £12 'not Apple' USB camera connector, into iPad Air so you can see the screen - the iPod Touch would be invisible at this distance. Mind you, the screen still only has the stupid spaceship on it.
Monday 5 March 2018
On the phone
Even better, on a 2012 iPod Touch, consuming less than 10% of the CPU, and quite happily synthesizing the organ while the GUI run's Apple's 'Game Demo' XCode project of the Phongy Spaceship.
Great on channel 13, Swell on 14, pedals on 15.
Next step, UI, then a trip to see Doug of Soundtestroom for a real demo, by somebody who can in fact play the piano.
Update - consumes under 10% os 2011 iPad 2. Nice.
Great on channel 13, Swell on 14, pedals on 15.
Next step, UI, then a trip to see Doug of Soundtestroom for a real demo, by somebody who can in fact play the piano.
Update - consumes under 10% os 2011 iPad 2. Nice.
Thursday 1 March 2018
Organ revoiced
So, during making of this pipe organ engine - actually way before that, when I was developing the Pi wavetable synth - I realized that pretty much anything that was a single, static wavetable sounded like a pipe organ. It’s just the way of things - not much else has an unchanging tone made up of a harmonic series. Your brain just goes ‘Yeah - that’s a pipe organ’.
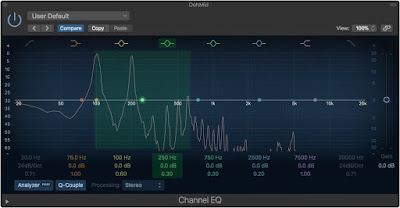
So I have decided to take advantage of that, and turn real instruments into pipe organ stops via wavetables, and that the first released implementation of the organ engine will be a completely fabricated set of stops, based on wavetables populated via harmonic analysis of the real instrument sounds that pipe organs strive to emulate. Or at least approximate, if not emulate. So I sat for 3 hours today, doing harmonic analysis of violas, trumpets, clarinets, oboes, sopranos, and came up with this - a completely synthetic organ, completely imitative (apart from the two pedal stops and the Great Diapason Chorus, which are computed harmonic series - the only instrument that sounds like an Open Diapason is an Open Diapason!), and it really sounds very organy. So, onward - UI and port to iOS / AU. And also, see if it will run on a Pi Zero - it should, it only has 13 stops.
Actually, sod the UI, at least for the time being - first things first, get it running on iOS with no UI at all, just to see how well it runs on a variety of hardware. It looks like iPhone 6 is the currently oldest device you can buy new, so if it works on my old 5C I’ll be delighted. So, no more updates until I can post a video of it running on iPhone 5C!
Sunday 18 February 2018
Subscribe to:
Posts (Atom)